Chat App
Description
For this project we will be building one of the classics of Node.js, an IRC-style chat application. We will rely on Socket.io library, which allow us to easily use websockets. Thanks to it, out chat will be up and running in no time.
About websockets
Websockets is a technology standard, implemented in most modern browsers, and in most languages and platforms (e.g. Android). After creating a websocket we will have a permanent bi-directional connection between a client and our server, this way, with little overhead, we can send data both ways without creating and destroying connections with each message.
This provides, not only a simpler implementation for some cases, but several performance improvements:
- No need of polling, because the server can notify the client directly.
- Small message size. Each message is only a few bytes, as no handshake or connection data is required.
- Large number of concurrent connections. In most cases, a server can handle more concurrent active connections with websockets than the same number of plain HTTP request.
 WebSocket diagram (www.pubnub.com)
Even if websockets are so great, they are not suitable for everything. Because of the overhead of having an active connection, websockets will provide an improvement over plain HTTP request when there are a lot of small messages or you actually need bi-directional messages. It may not behave prorperly with big messages like sending big JSONs or files.
For this problem, websockets provides an ideal solution, as we can send messages to the server, and the server can notify all the other clients in real-time.
Setup
To begin our project:
npm initnpm install --save socket.io expressto install the express and socket.io libraries- [email protected] is the websockets library we will use.
- [email protected] is a lightweight http framework for node, which will simplify the process of creating a webserver.
This project, as most web-based projects, require two separate "programs", the back-end, which will be our Node.js server, and the front-end, which will be a webpage written with Html and JavaScript.
We will begin with a simple http server to provide our webpage.
HTTP Server
const express = require("express");
const app = express();
const http = require('http').Server(app);

app.use(express.static('public'));

//server starts listening to port 9090
http.listen(9090, () => {
    console.log("Magic happens in port 9090");
});
server.js
In the first block, as usual, you'll see the libraries we are importing. We are also creating and setting up our express server:
const app=express();
This is one way to create a new express app. We can create other express instances the same way. While it is not needed in some cases, here we are going to explicitly create a native http server and bind our express app to it.
const http = require('http').Server(app);
Express provide a simplified syntax to configure our server and create our APIs, like the plain http server discussed before, we are going to configure it before starting it.
app.use(express.static('public'));
The use command allows us to set a middleware to our express server, several libraries work as middlewares that are executed with each request. In this case we create a built-in static middleware, which automatically serves a folder as static resources.
While express.static provides a similar behavior as more heavy servers as
nginxandapache, it is not as fast or reliable for production environments for serving static files.
Serving that folder means that writing in our browser localhost:9090/my_file when the server is running will retrieve the file /public/my_file.
Finally, we start our http server as seen before, in the port 9090.
If we execute node server.js we will see the text:
Magic happens in port 9090
If we try to access with our browser to localhost:9090 we will see a message Cannot GET /. This happens because there is no route or file pointing there (we are trying to serve a public folder that doesn't exists).
For this to work, we need to create our webpage
Client Webpage
To create the "client", we need to implement the webpage code with plain Html and JavaScript. This code will be served by our server and will be executed by the browser, not by node.js.
To do this, we are going to put our webpage in a a new folder public/. In that folder we will create the file index.html, which is, by default, the first file a browser will request when accessing a webpage:
<!DOCTYPE html>
<html>
    <head>
        <meta http-equiv="Content-Type" content="text/html; charset=utf-8">
        <title>My Chat</title>
    </head>
    <body>
        <h1>Don't Panic!</h1>
    </body>
</html>
index.html
This is a simple example of an html webpage. If we start our server now and go to localhost:9090 we should see "Don't Panic!" in big letters.
We also can access the same page by going to
localhost:9090/index.html.
Socket.io
The Socket.io library implements a server-side, which is going to be executed by our node.js back-end, and a client, which can be executed in our browser.
Socket.io is based on events to manage our messages. There are two important methods:
on: Will listen to an event, and execute a callback when that event is received.socket.on('my_message',callback)
emit: Will send a message (event), and optionally some content as text.socket.emit('my_message','content')- With
socket.send('content')we can send a message with a default eventmessage
These two methods can be implemented in the back-end or front-end, when an emit is fired in one side, it will execute the on in the other side. If there is no listener the event will be ignored.
Socket.io is a complex library that allows peer-to-peer communication, broadcasting and channels, the full documentation can be found at https://socket.io/docs
With Socket.io we can send any event we want, but there are a few events sent by default, the most important are:
- message: Default event for our messages using
socket.send - connection/connect: Automatically fired when a socket connects
- In the client the event is always
connect
- In the client the event is always
- disconnect: Fired when a socket disconnects
The events connect and disconnect allows us to know when a client or server disconnected or connected. There are other events such as
reconnectorerror.
Socket.io - Server
We already installed socket.io in the setup section, we need to import it into our server.js, we can do it under the previous require we did for express and http:
// requires
const io = require('socket.io')(http);
// ...
server.js
As you can see, we are binding our http server to the socket.io library the same way we did with express. In this case we execute the socket.io method directly without storing it in a separate variable.
Our server must listen to any message, and the broadcast it to all the users:
io.on('connection', (socket) => {
     console.log("User connected");

    socket.on('msg', (content) => {
        console.log("Received:"+content);
      });

    socket.on('disconnect', () => {
        console.log('User disconnected');
    });
});

// http.listen...
The first event io.on will fire for every websocket that connect, you may think of an user "login". The callback passes an argument which is the actual socket.
The other 2 events are attached to that given socket, the first one will fire for every msg event received, we will use that event to send the message. For now we will only log the content received.
Finally, a disconnect event that will be fired when the socket is disconnected.
In this case, we don't need to perform any actions in connect/disconnect, but usually you'll store some users data while they are connected.
Socket.io - Client
We have a simple http server with websocket support, now we need to implement our client. The first step is to get the socket.io library, usually we will want to download it as a resource or from a CDN. However, the server-side socket.io library automatically serves the client js file, so we only need to add the following code to our index.html file:
    <!-- Body Code -->
    <script src="/socket.io/socket.io.js"></script>
</body>
We also need to implement a bit of logic in our client, in order to keep everythin nice and tidy, we will create in our public folder a new folder js, inside the folder we create the file chat.js with our chat implementation:
const socket = io.connect();

socket.on('connect', () => {
    alert("Connected");
});
/public/js/chat.js
The implementation here is much simpler, as we only need to handle one socket. The client-side library automatically exposes the io object, so to create our socket we only need to execute io.connect() which creates and connects the websocket, we can set any URL we want, but by default will connect to the same origin server.
Then, when the connection is successful, the callback will be executed. For now we will show and alert notifying we are connected, remember that alert is a browser specific command.
Now we are ready to perform our first real test if you fire the server and go to localhost:9090 you should see the same page as before, but shortly after you should see an alert saying "connect". If you go to your terminal, you should also see a "User Connected" log in the server.
You can now try some of the basics socket.io features commented before, if you close your browser you should see a "User disconnected" message in the server. You could also try opening several browsers and you should see how the server understands how multiple "users" (or different sockets) are connected. Not only that, but if you close the server with the page opened and start again the server, you will see the alert again. This is thanks to the automatic reconnection feature of Socket.io
We can connect and disconnect, but we still can't send or receive messages. Lets fix that
Chat web
We first need a proper webchat!, to do that lets modify index.html, we will replace the current content inside <body> with the following:
<!-- body begin -->
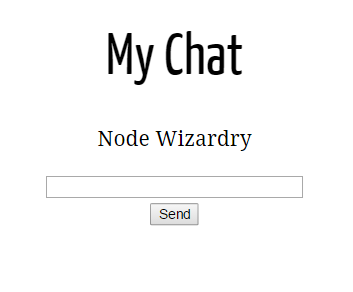
<center>
<h1>My Chat</h1>
<p id="chat"></p> <!-- Chat messages will be shown here -->
<form action="javascript:void(0);" onsubmit="javascript:send();" id="chat-form">
<input type="text" id="user-input" size="30" /></br>
<input type="submit" value="Send" /> <!-- when input call send function -->
</form>
</center>
<!-- scripts -->
<!-- body end -->
This is a typical html form, with a text-box and a "send" button. When the user writes something and click send, the function send() will be called thanks to the onsubmit value.
You can learn more about html in TODO: insert w3school link or something
If you start the server and go to localhost:9090 now you should see something a bit more interesting:
The layout is ready, but we still need to implement a few things
First, we need to show to the user the received messages. We will do that by creating a new event in the socket of chat.js:
socket.on('receive', function(msg) { // msg is the content of the socket message
    const chatobj=document.getElementById("chat"); // gets chat DOM object
    //appends msg to chatobj content
    chatobj.innerHTML=chatobj.innerHTML+'</br>'+msg;
});
mychat.js
Here, we are using the custom event receive, when the server sends us a "receive" message, we will add it to the html.
We should add a "disconnection" message, in case the user loses the connection with the server, to do it, we add another event "disconnect" that will be called if the socket is disconnected.
socket.on('disconnect', function() {
    const chatobj=document.getElementById("chat");
    chatobj.innerHTML=chatobj.innerHTML+'</br>'+"Server connection lost";
});
Instead of showing a nasty alert, we will just show a message telling the user what happened. We can do the same to the "connect" event, so we don't need the alert anymore:
socket.on('connect', function(){
    const chatobj=document.getElementById("chat");
    chatobj.innerHTML=chatobj.innerHTML+'</br>'+"connected";
});
We only have one thing missing, sending the message. As mentioned before, our form will automatically call the function send() when the user presses the button, so we need to create that function, we can do it right after our sockets events:
function send() {
    const input = document.getElementById("user-input").value;
    document.getElementById("user-input").value="";
    socket.emit('msg',input.trim());
}
3 things are happening here:
- We get the value of
user-input, the DOM object where the user will write his text. - We remove the text in
user-input. - We send that value with the "msg" event, remember that
msgis the event our server is expecting.trim()is a js native method for strings that removes any whitespace at the beginning and end of a string, so " hello " is turned into "hello".
Here you can see a rough diagram of what's going on when an user connects and sends a message:
And thats it for our client, lets try our chat again!
When entering the web you should see a connected message instead of an alert, we are going to type something and click send... and nothing happens...
What's happening? Lets check our server. If you see the terminal log, you should see something like this:
Magic happens in port 9090
User connected
Received: Hello World!
The server is receiving the message! That's good, the problem is that we haven't send the message back to the other users!.

Server broadcasting
In server code (server.js), we need to modify the code inside our event on("msg"), so instead of just showing a message to console, we send the message back to the users.
We just need to modify that event:
socket.on('msg', function (content) {
    io.emit('receive', content);
});
server.js msg event
Note that here we are using io.emit instead of socket.emit, this is because we want to emit the event to all connected sockets, not only the one that sent the message.
If you look carefully to server.js code, you will notice that we don't need any structure to manage multiple sockets, thanks to callback scopes, a new "socket" variable is created with every connection. This kind of implementation only allows us to answer to the same socket that sent us a message. For a more complex behavior we could need a proper structure, instead of relying in scopes. This is exactly the same behavior you will find in the express library when handling multiple requests.
If we try our chat again now... "Sucess"! when we write something the server answers back and we see the text in the chat!.
We can now play opening several browsers and trying to chat. You can even try real chat with another computer in your local network!.
Possible improvements
Our chat implementation is very rudimentary, but it is built on top of of some of the most awesome web technologies, there are a lot of possible work to do if you want to improve your own chat service!
- Improve the webpage adding some css styles.
- Add users to the server and one-to-one messages.
- Build and android client app, this can be done with any websockets or socket.io implementation in Java
This project was based on socket.io chat tutorial